Deciding where to set up your home recording studio can feel overwhelming, but it’s key to getting the sound you want. Allow me to offer you some tips on setting up a 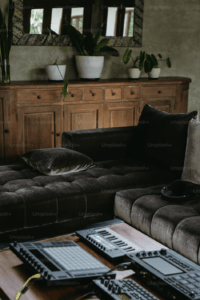 home recording studio.
The room size matters. Bigger spaces might seem like the go-to choice, but they can create unwanted echoes. Smaller rooms can be cozy and sound great, but watch out for too much bass buildup.
Acoustics play a critical role in shaping how your recordings will sound. Hard surfaces bounce sound all around, making everything echoey and less clear. Carpeted floors, soft furniture, and even a few well-placed blankets can help absorb those unwanted sounds. Figuring out your room’s acoustics early on is super helpful.
Let’s talk location. You don’t want to be next to a busy street or a chatty neighbor. A quieter spot in your house makes life so much easier because the less noise around, the cleaner your recordings are going to be. Soundproofing isn’t just for the pros either. Even basic steps like sealing windows and gaps below doors can make a big difference.
The way you set up your studio can massively affect your workflow. Try different arrangements to see what feels natural. Keep the gear you use most often close by. If you’re always reaching over or around stuff, it might be time to reorganize. Your space should feel like it’s working with you, not against you.
Finally, when you’re getting started, don’t worry about it being perfect. Adapt and adjust as you find what works and what doesn’t. Remember, your home studio is an extension of your creativity, so it should reflect how you like to work best.
Tips For Setting Up A Home Recording Studio – Selecting Essential Equipment & Building Your Foundation
Kitting out your home recording studio starts with some must-have gear. The main pieces of this puzzle? Microphones and audio interfaces. Knowing which mics to go for keeps things on point from the start. Condenser mics capture vocals and softer sounds beautifully, while dynamic mics are your go-to for louder instruments.
Your audio interface is basically the heart of your setup. It’s what connects your microphones and instruments to your computer. Going for one with multiple inputs can be a lifesaver if you plan to record several things at once. Pay attention to the quality of the preamps too, since they can affect your sound’s warmth and clarity.
Sound output is just as crucial as input. That’s where headphones and studio monitors step in. Headphones should be comfortable for long sessions, and closed-back types work wonders for isolating sound during recording. When it’s time to listen back, studio monitors give you a true representation of your mix without coloring the sound. It’s a good idea to compare both to understand how your tracks translate across different devices.
Sorting out your essential gear is a big step in making your studio come alive. Don’t worry if it’s all a bit overwhelming at first. Focus on getting the basics right and you’ll be well on your way. Gear can always be upgraded and expanded later as you feel more comfortable.
Acoustic Treatment: Enhancing Sound Quality
The sound quality in your home studio can take a hit if you don’t give some love to the room’s acoustics. It’s about making the space work for you, ensuring your recordings sound balanced and professional. Room acoustics affect how sounds bounce around, sometimes amplifying unwanted frequencies.
Acoustic panels are game-changers. They work by absorbing and diffusing sound waves, reducing reverb and echo. Placing these panels correctly is crucial; usually, the first reflection points—where sound bounces first—are the target areas. Corners can build up bass frequencies, so bass traps can be handy there.
DIY solutions can be effective if you’re on a budget. Thick blankets and foam can be makeshift absorbers, but they might not have the lasting effect of professional options. Investing in some proper panels when you can will definitely pay off in sound quality.
Some folks may relocate furniture to improve the room’s sound naturally. Bookshelves filled with items can diffuse sound, spreading it out and reducing harsh echoes. It’s about experimentation—see what works best in your space.
Once you’ve tackled the acoustics, you’ll notice the difference in your recordings. Subtle improvements go a long way in capturing sound cleanly, and that clarity is what sets a good home studio apart from a great one.
Computer Setup: Bridging Creativity with Technology
Your computer is the powerhouse behind your home studio, so making sure it’s up to the task is essential. Think about speed – a fast processor and plenty of RAM keeps things running smoothly, especially when you’ve got multiple tracks and effects going on.
Choosing the right Digital Audio Workstation (DAW) is like picking your creative partner. Different DAWs have unique vibes, setups, and features, so it’s about finding what fits your workflow best. Some are better for beginners with user-friendly layouts, while others might offer more advanced features for those with a bit more experience.
Once you decide on a DAW, managing plugins and virtual instruments becomes a key focus. Too many can bog down your system. Organizing them into presets and favorites can make things much more efficient.
Backing up your work cannot be stressed enough. Regular backups to cloud storage or an external hard drive provide peace of mind and ensure you don’t lose those awesome takes and mixes. Automation in your DAW can handle backups, so you don’t even have to think about it.
With the right computer setup, you’ll have the tools at your fingertips to make recording and production smooth sailing. It’s about creating an environment where tech enhances creativity rather than gets in the way.
Tips For Setting Up A Home Recording Studio While Mastering the Workflow: From Recording to Producing
A solid workflow is the backbone of any productive studio session. Getting your sessions organized from the get-go saves loads of time and keeps creativity flowing. It all starts with consistent naming conventions for files and folders, making it easy to find things when you need them.
A streamlined recording process minimizes setbacks and interruptions. Recording checklists are helpful; they ensure everything’s in place before hitting record. This means less stress and more focus on getting that perfect take.
Once the tracks are down, it’s all about editing and mixing to polish your sound. Familiarize yourself with your DAW’s editing tools—cutting, comping, and crossfading are your friends when it comes to tightening up performances. Tweak your mix with effects like EQ and compression to add clarity and punch.
Automation can breathe life into a static mix by managing volume, panning, and effects without the need to ride the controls manually. It adds dynamics and interest to tracks, making them sound more professional and engaging.
Balancing creativity with productivity is key. Learning shortcuts and creating templates for your projects can speed up routine tasks, leaving more time for the fun parts—experimenting and exploring your musical ideas. With a strong workflow, your studio becomes a place where creativity and efficiency meet seamlessly.
I hope with these tips for setting up a home recording studio you will be able to reach your goals and live out your recording dreams. God bless.